
JDsleds.com -> Technical Information
-> The Barn Find
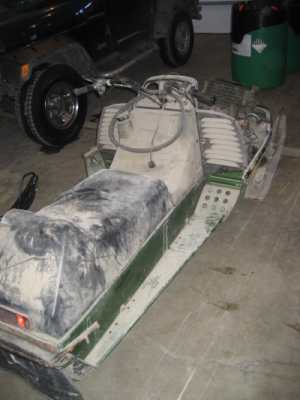
"The Barn Find"
So - you've located buried treasure in the form of a vintage snowmobile
hiding out in a barn, shed, or perhaps even out in a field.
This article describes the right way to bring it back to life, and have
a reliable machine to enjoy riding, rather then struggling with it
later while the snow is flying.
Chapter 1: Barn Find - Now What?
So you dragged home a sled that you found in a
barn that has
been sitting for years. You have decided to get it running and go
out and have some fun on the
snow.
So what do you do and where do you start? I read a lot of posts
on here from new members that jump right on the
engine to
get it running.
Maybe you do get it to run but the fun on the snow may only last 15
minutes. A sled that has sat for years needs a lot of
attention. There are a lot of things to look over and
address on a vintage machine
in
addition to the engine. Chances are that you will not have much
success if you start work on it
Saturday
morning and expect to hit the trails later that day.
Another scenario is the sled you drive by everyday on the way to work.
The
first time you saw it you stopped and looked at it with the $600 FOR
SALE sign
on it. A few days later you notice it has been moved and the
price is now
$500. The
next week you see some people out there looking at it.
But two days later it is still there and the sign says $200.
So you stop and knock on the door this time. The guy says it may need
some
work. He really just wants it gone. Others have looked at it,
maybe even drove it, but it is still there.
You buy
it for $100.
There is probably a good reason so many others have passed on this
sled. Likely
lots of reasons! But if you think that because you got it so
cheap you don't want to put
much
money into it, you are not being realistic. If you want an old
sled to be safe and reliable it will involve two
things;
time and money. Make those three things: Patience.
Over the years I have resurrected over 100 vintage snowmobiles. Some I
found in
the trees, others in sheds. Some were bought at swap meets, others won
on
e-bay. A few were free for the taking; others set me back $50. A
few I paid
hundreds
for. But the upfront cost is nothing compared to what it will
take to do the
thing
up right.
A good rule of thumb is the cheaper the sled was the more it will cost
to bring
it back to a condition that is close to what is was when it was new.
And that does not mean restoring it to show condition. That will run
you into
serious money. What I mean is making sure that it starts and runs
reliably, the brakes
and
lights work, and it looks decent.
Ask anyone that has done a full bore restoration and if they are honest
they
will tell you they have thousands into it. I have nothing against
restoring; in fact I have done a couple myself. But I take pride
it putting them back on the snow rather than in the
show. Making sure that all the original parts are in place and
everything
works like
it is suppose to is what I do with most of the sleds I have had my
hands on. Originality and completeness is very important when you
go to sell a
machine, especially
if it is a rare model. Some parts are almost impossible to find.
Chapter 2: Back to Front
I figured I would take a few minutes and type up
my thoughts
after reading hundreds of post on this forum.
As mentioned earlier most guys jump right on the engine from the get
go. So do I. The first thing I do is pull the engine
out of the chassis and set it
aside. It is the last thing I look at when I start a sled
project. WHY?? Because I feel it is the easiest thing to fix.
I don't know, maybe there is something wrong with me.
So starting at the back...
Rear bumper: This is important as it
adds rigidity to the tunnel. It makes lifting the sled easy. It may be
part of
the tow hitch. If it is missing or broken replace it.
Taillight: It is important to have a
working taillight and if so equipped a brake light. For a buck you can
buy a
new 1157 bulb and be safe and be seen. Replacement lens are available
and
cheap.
Seat: While some say this is only a
cosmetic thing, keep in mind with limited suspension travel your back
will
appreciate foam that is in good condition. A new seat will set you back
a few
hundred.
Rear suspension: It doesn't matter what is under the tunnel... boggies,
slides
or a hybrid combination of both, pull it out. Usually 6 bolts, but
sometimes
only four. Set it on the bench or a couple of saw horses and let the
fun begin.
All wheels (idlers and boggies) have bearings. If they are stuck,
noisy, broken
you have work to do. Slides may need replacement. Every weld on the
system
needs to be inspected for cracks. Springs need to be checked. Some
sleds have
up to 12 rear suspension springs. Bushings may be worn out. Shocks may
be
broken, stuck or weak. Limiter straps may be missing, worn or broke.
Tension
adjusting bolts may be stripped. Spring guides broke. Rail bumpers
missing.
There is a lot to look at on the suspension but it is very important
that every
part be checked. A broken spring tang can ruin a track in seconds. Or
worse,
can lock up the track and cause a serious accident.
Track: If you have a cleated track, look
at every cleat and rivet. A broken cleat can be really dangerous.
Remove and
replace any rivets or cleats that are loose, cracked, etc. I have
actually seen
a cleat stuck up through the seat clean though the tunnel. Not a
problem if you
are done fathering children. A rubber track needs to have all the clips
in
place and in good condition. Clips cost a buck a piece. Replacing all
of them
is not out of the question and cheaper than replacing the track. This
does require
a special tool. If the track is studded, picked, clawed or whatever you
have
more to inspect. A stud flying out the rear of your sled at 60 MPH will
not
make the guy behind you very happy.
Skis: Look for cracks and enlarged
mounting holes for the spring brackets. Ski loops and shock mounts in
particular
are often fatigued and cracked. Make sure that the leaf springs are all
intact
and have even pressure side to side. Wear rods, carbides or hard bars
need to
be in usable condition or replaced. Spring cushion slides may be worn
out or completely
missing. Ski bumpers missing. Mounting bolts worn out or the wrong
size. Many
sleds have cast saddles which can be cracked. The saddle bolts may well
be worn
out. New bolts will help with sloppy steering and cost less than a buck.
Ski shocks may be bent, frozen, leaking or just plain junk.
Belly pan: That sure is an ugly dent
under there. But with the engine out, a 30 second fix. Look for missing
or
loose rivets. Bumper mounts and hardware need to be inspected. Hood
hinges,
guides, hold downs. Bumper got a nasty dent? Take it off and press it
back into
shape.
Steering: There is nothing worse than
sloppy steering. It is unsafe and makes your arms sore. Set an
upside-down 5
gal bucket on the floor between the skis. Grab the ski loops and lift
the skis
up and, then with your foot push the buck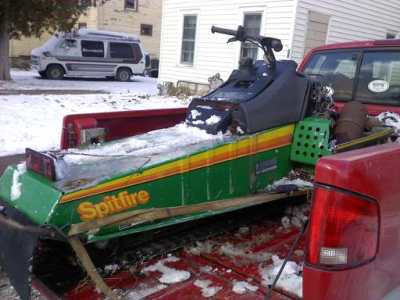 et under the front bumper. The
next
step will be an eye opener! Grab both ski loops and move then in
opposite
directions. If you have more than an inch of play or slop you have a
job in
front of you. Any and
all of the following can be worn out. Tie rod
ends,
linkages, spindle bushings, saddle bushings, spring cushions, steer
post
bushings, pivot bushings, saddle bolts. Any part or piece that has wear
will
contribute to the play. Now grab each ski one at a time from the side.
Does it
wiggle sideways? More work found. Grab the handle bars. How much can
you move
them before one ski or the other moves? I have yet to see any sled with
more
than 1000 miles on it that did not need some quality time spent on
steering.
But your efforts will be rewarded with superior handling and control.
et under the front bumper. The
next
step will be an eye opener! Grab both ski loops and move then in
opposite
directions. If you have more than an inch of play or slop you have a
job in
front of you. Any and
all of the following can be worn out. Tie rod
ends,
linkages, spindle bushings, saddle bushings, spring cushions, steer
post
bushings, pivot bushings, saddle bolts. Any part or piece that has wear
will
contribute to the play. Now grab each ski one at a time from the side.
Does it
wiggle sideways? More work found. Grab the handle bars. How much can
you move
them before one ski or the other moves? I have yet to see any sled with
more
than 1000 miles on it that did not need some quality time spent on
steering.
But your efforts will be rewarded with superior handling and control.
Bulkhead: Look for cracks on all welds.
Worn out motor mounts? Bad mounts cause excessive vibration and make
proper
clutch/belt alignment impossible. Any misaligned pieces or previous
repairs?
Missing bolts? Allows look for bits and piece in the bottom of the pan
as you
can learn a lot for what you find there. If you have electric start,
check the
battery box real good.
Gas tank: All tanks have a vent,
somewhere. It can be in the filler cap or a separate small barb
sometimes with
a small short line that goes nowhere attached. The tank mounts must be
intact
to hold the tank from shifting. A leak can develop form the tank
rubbing on the
chassis. Inside the tank there is a pickup tube. There should be a
filter with
a check valve on the end of this tube. This makes the difference
between
starting on the first
pull and starting and the 15st pull. The tank
outlet
grommet needs to seal on the tank. A new grommet cost $3.00. Most all
gas caps
have a rubber gasket under them. If it is missing you will have gas
leaking out
the cap while ridding. This makes your crotch smelly.
Time for a break.
Chapter 3: Bottom to Top
Ok so time to get to
the meat and potatoes. The Drive:
Chain case: Chances are when you pull the cover off you will find
either black
tar that 40 years ago was liquid or you will find nothing. But as long
as the
cover is off and suspension is out, remove the two bolts that retain
the
sprockets. Pull the two sprockets and chain off at the same time and
let them
soak in solvent. A coffee can with kerosene, a parts washer or whatever
you
have. After they are clean examine them for worn or broken teeth. Check
the
chain over real close for wear, bent or damaged links. Most of the time
brand
new parts are available. Now grab some sockets and take out the 6 bolts
that
hold the drive shaft bearing flanges in place on the tunnel and the
speedometer
drive. Loosen the bearing retainers on the drive shaft. Slide the drive
shaft
to one side and drop the track off the shaft. Then pull the drive shaft
out of
the chassis. New bearings cost $15 each. Buy them! Inspect the drive
sprockets
carefully. Look for cracks, excessive wear on the teeth. Look for signs
that
the sprockets have shifted on the shaft. Check the spines on the shaft
and the
bushing for the speedometer drive. And the square drive key. Having fun
yet?
Jack shaft: Simple hand tools will go a
long way when working on a sled, any sled, any color, any age. Grab one
of the
two sheaves on the clutch and give it a wiggle. If it wiggles you have
more
work. Probably needs new bushings. Remove the secondary clutch from the
shaft,
usually just one bolt. Set it aside for later. Look at the keyway on
the shaft
and the key itself. A new key cost 50 cents so if in doubt, through it
out. Now
grab the shaft in the middle when it is still mounted in the sled. If
you can
move it at all up or down or side to side you have more bearings to
buy. Zero
movement is the spec here. Grab the brake disc. Wiggle it. Here there
should be
play. The disc has to be able to move side to side (or float) on the
shaft
otherwise the brake pads will wear prematurely. Look at the pads. How
much
material is left on them and is the wear even? Are there groves worn in
the
disc? Are the calipers loose? Any missing hardware? If any part of the
brakes
need service than remove the whole assy.
Secondary Clutch: While the clutch is
very simple in design and easy to service its proper operation is
critical to
overall performance. There are many different clutches out there but
they all
operate on the same principle. First thing to do is take it apart.
Caution is
needed here as the assembly is under spring tension. Also note that
clutches
are balanced at the factory so you should mark the two sheaves and the
ramp so
you can reassemble in the same position. Either bolts or pins hold it
together.
Keep pressure on the assembly as you loosen or remove the retainers so
the
spring does not launch them into your face. A vise, a buddy or a
specific
clutch holder will do the trick here. Ok so now you have about 8 pieces
laying
the work bench. Clean everything first then inspect. Sheaves need to be
groove
free and smooth. The ramps may show wear but should be even. The
slides, cams,
buttons or shoes are only a buck apiece so replace at will. The spring
tangs
may be broken or cracked. The spring should look straight. If the coils
are
deformed replace it. Closely examine the two holes that the tangs fit
in. Look
for fractures. Clutch parts are made from die cast metal so do not
confuse
casting flaws with cracks. Some high performances, i.e. racing
components are
made from aluminum and spin at 12 grand. These clutches are best left
in the
hands of professional rebuilders as balance is critical at those RPM.
They can
also do ultrasonic examining for metal fatigue. Are new bushings
needed? Lube
the shaft, bushings and ramps on reassembly. The spring usually goes in
the
middle hole but not all clutches have 5 holes. Some only have one.
Proper
preload of the ramp is very important. Consult the service manual for
you
specific sled.
Primary Clutch: How do you get it off
the engine? This is one place where the proper tool is warranted. There
are
probably 30 different clutch pullers out there for as many different
clutches. If
you only intend to work on a couple of different types, than buy the
right tool
for the job. Die cast metal is no place to use a torch. Same goes for a
3-jaw
puller. Otherwise borrow one from a sled shop or tote your engine to
their door
and have them pop it off for you. Either way a little prep work will
make
removal easy. Remove the retaining bolt, washer, locknut, and spacer
and lay
the engine on its side. Spray your favorite penetrating oil in the
hole. Let it
sit there at least overnight. Most all clutches are friction fit on a
tapered
shaft so if it has not been off in 40 years it will be stuck t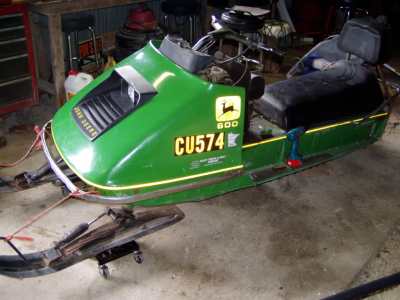 ight.
Some really
old makes actually had threaded on clutches. Once it is off it needs to
be disassembled.
Again it is under spring pressure so use caution. Unlike the secondary,
the
primary can have a lot more parts. Maybe as many as 40 pieces. It is
not necessary
to completely rip it apart but you do have to open it to check for wear
and lubrication.
If you have to replace some of the smaller pieces, than set out your
parts
tray. There are cams, arms, spacers, rollers, pins bolts, ramps,
splines,
bushings, etc. Did I say only 40? Some clutches actually have a bearing
for the
belt to ride on at idle. Anyway the key here is wear. Once all the
parts are
clean, with your eyes and your fingers you can inspect every part and
the bad
ones will be obvious. You will be able to see wear, cracks or things
that don't
move that should. Lubricate parts that need to stay free. Reassemble.
ight.
Some really
old makes actually had threaded on clutches. Once it is off it needs to
be disassembled.
Again it is under spring pressure so use caution. Unlike the secondary,
the
primary can have a lot more parts. Maybe as many as 40 pieces. It is
not necessary
to completely rip it apart but you do have to open it to check for wear
and lubrication.
If you have to replace some of the smaller pieces, than set out your
parts
tray. There are cams, arms, spacers, rollers, pins bolts, ramps,
splines,
bushings, etc. Did I say only 40? Some clutches actually have a bearing
for the
belt to ride on at idle. Anyway the key here is wear. Once all the
parts are
clean, with your eyes and your fingers you can inspect every part and
the bad
ones will be obvious. You will be able to see wear, cracks or things
that don't
move that should. Lubricate parts that need to stay free. Reassemble.
Controls and Instrumentation: Things
like brake and throttle levers, switches, buttons, levers and knobs
should all
be checked for smooth operation. The ignition should lock the key in
the switch
in any position except off. If you have ES, the spring return should
snap the
key back to RUN on its own. If you did not get a key with your sled,
brand new
switch assembly with two keys are still made for just about any sled
for less
than $20.00. Look at the cables for frayed wires, kinked housings or
rust. If
it is not free moving replace it. Check plastic levers for cracks and
wear
where the pins attach it to the blocks on the handlebars. Choke levers
or knobs
should move freely. Check for proper operation of primer buttons or
knobs.
Check gauges for cracked lens and proper mounting in the dash. Test
dimmer
switches with an ohm meter or continuity tester before you even start
the
engine so you know they work and won’t become a pain in troubleshooting
electrical issues later. Same goes for throttle safety circuits. These
can get
very complex on newer models with as many as three on the handlebars
and three
on the carburetors with a triple under the hood. Test light bulbs on
the dash
gauge back lights. It is easier to do it now then after all the air
boxes and other
parts are installed on the sled. Any other electrics can be checked
before
reassembly also. Things like high beam indicators, low oil lights,
warmers etc.
Chapter 4: The Heart
of the Beast
Are we having fun yet?
Exhaust: It is important that the
exhaust system be intact and correct for the engine. From the manifold
to the
outlet the system must be leak free but remain flexible. If parts of
the
exhaust were rigidly mounted to the chassis it would vibrate itself to
pieces
hence the use of springs and rubber mounts. All attachment points need
to be
inspected to ensure they are intact and serviceable. Pay attention to
ball
joints and flex tubes. Make sure that the muffler outlet is centered in
the
hole as not to rub or melt the belly pan. Ensure the muffler and/or
expansion
chamber has not become a home for mice. Any resistance to air flow or
change in
volume inside the exhaust will affect performance. Remove the exhaust
and shake
it. Nothing should rattle inside. Hold one end up and smack the side
with your
hand. Do you see acorns and seat foam falling out? Stick a garden hose
in one
end and give it an enema. After it flows clear switch the hose to the
other end
and repeat. It is amazing how much crap can be in a pipe. When you
reinstall
the parts make sure that nothing touches the system that can burn or
melt.
Wiring harness, tool bag, spare belt etc. Any heat shields that were
originally
on the machine were there for a reason and should be replaced if they
are
missing. Any leaks repaired either by welding, muffler bandage or
replacement.
A leaking exhaust will make a filthy mess under your hood.
Fuel and carburetors: The biggest enemy
here is dirt. Dirt can also mean rust. Vintage metal fuel tanks rust on
the
side. Ever wonder what happened to the fuel gauge on the cap when you
take it
out of the tank for the first time? It may be lying in the bottom of
the tank
along with a few decades worth of pickup lines and filters. A new
inline fuel
filter is a must with any sled project. Cost is $3.00 and you better by
two
right away as the first one can plug up fast. Complete replacement of
all fuel
lines is a must. And don't forget about the piece from the crankcase to
the
fuel pump. Do not use black gas line like a car engine uses. Mixed fuel
has a
nasty habit of dissolving the rubber hose from the inside. Use quality
line
made for sleds. The 30 cent foot vinyl stuff from the hardware store is
not the
way to go. Quality line will cost a buck a foot and is a bargain at
that price.
Carburetors and fuel pumps need to be completely disassembled and
thoroughly cleaned;
soaking overnight is the way to go. There are tiny little passages that
have to
be open throughout the pieces of a carburetor. Any moving parts need to
move
freely. Any rubber or plastic parts need to carefully inspected. If in
doubt
replacement is the way to go. Complete overhaul kits are available and
cheap at
$25 for carburetors and less than $10 for pumps. Check that the correct
needles
and jets are in your carburetors. It does not matter what brand or
configuration of components you have they all work the same if they are
in
serviceable condition. A Mylar gasket that is stiff or a seat that is
worn will
be a headache when you try to make it run later. Most carburetor kits
come with
instructions and most important, a diagram as to how it all goes back
together.
Some diaphragm carburetors can have over 50 parts and some are really
tiny. A
clean well lit work area and your wife's muffin pan will aid in a good
rebuild.
Electrical: Wiring harnesses should be
inspected from the headlight to the taillight and everything in
between.
Connectors pulled apart with the pins and sockets cleaned. Rodents love
to chew
on wires so look for abrasions or cuts that can short out to the
chassis. Any
connections to the framework, tunnel and engine should be removed and
cleaned
with a wire brush to ensure continuity. Any heat sinks on voltage
regulators
need a clean contact with the chassis to dissipate heat and maintain a
good
ground. Any crimp terminals should be cleaned. If you see anything in
the
wiring that looks like it is not original pay close attention to what
was
changed and why. Too many previous owners thought they knew more than
the
factory engineers that designed the snowmobile and made changes, many
times for
the worse. Keep in mind that the electrical system on a sled is
actually two separate
systems. Ignition and lighting: The only
thing they share in common is chassis ground and the flywheel.
The lighting system starts out as AC or alternating current at the
stator. It
remains AC unless the sled has electric start, in that case at some
point DC or
direct current is required to charge the battery, engage the solenoid
and crank
the starter. Some models actually used DC to run the lights. Some
really old
engines had such weak lighting coils that they did not use voltage
regulators.
Modern sleds with high output coils use an electronic voltage regulator
but
most vintage sleds use the same basic regulator and new ones only cost
$20.
Very few sleds used fuses or circuit breakers so a short circuit can
take out a
coil requiring replacement. Some older models actually used two
lighting coils
such as early Yamahas where one coil was for the brake light only and
the
second coil was only used when the key switch was in the RUN/Lights
position.
Some sleds did not use a light switch; the lights are one whenever the
engine
is running. This makes for a simpler system and is a safety feature.
Pay close
attention to the light bulb sockets. A shorted wire in the socket will
dim out
all the lights on the sled.
The ignition system can be points or CDI. CDI stands for Capacitive
Discharge
Ignition and is the more reliable system as the only moving part is the
flywheel. But when it does fail it costs a lot more to fix. Components
can
include the CDI box, trigger coils, pulse coils, exciter coils, pickups
or any
combination of these. The remaining components are shared with the
points
system and include external or primary coil(s), spark plug wires (high
tension
wires), plug cap and the spark plugs themselves. Spark plugs need to be
of the
proper heat range for the engine design and fuel used and the proper
length.
There are no universal spark plugs for engines. Some CDI systems use
simultaneous
fire where both sides fire at the same time. They have only one
external coil
and fire twice in one revolution. With some CDI systems the timing is
not
adjustable mechanically. There are two types of systems out there: open
and
closed. This refers to the way it stops the engine. In an open system
the
contacts on the key/kill switches are open to run. On a closed system
they have
to make a connection in order to run. With the open system you can
unhook the
connector at the engine the engine will run.
The simpler points system consists of points, condensers and coils all
mounted on
the stator plate. The remaining external components are shared with the
CDI
type ignitions. All points systems are open type systems. When you stop
the
engine with the key or kill switch you are making a connection between
the
points and hence no spark. There are several stator designs out there
and on
some if you have a failure on one side it will affect the other. On the
rest
you can still have spark on one side. Point gap has to be checked
carefully.
Timing is adjustable by small movement on the stator plate in the
slotted
holes. All components of a points system can be checked with an OHM
meter. All
key/kill/safety switches can also be checked. CDI Boxes cannot be
tested this
way. Whatever type of system is on your sled a wiring diagram is a
great help
in troubleshooting. When testing you are looking for opens or shorts. A
short
is zero ohms. An open is infinite ohms. All coils have some resistance.
It may
be as low as 0.5 ohms or as high as 3000 ohms, but that is not the same
as zero
or open. Key switches can have as few as two connections or as many as
seven.
The most common is five. Two are for ignition and are NO (normally
open). Two
are for lighting and are NC (normally closed). The fifth one is for the
electric start and there may not be a wire on this terminal if the sled
was not
built with ES.
So what did I miss?
Oh yeah, the engine.
Chapter 5: The Mill
So we got to the engine.
Two stroke engines all work the same whether they have one, two, three
or four
cylinders. They can be configured as horizontally opposed, vertical or
rotary.
They all need three things to run: Compression, spark, and fuel.
Compression: Depending on design compression can be as low as 30 lbs or
as high
as 200 plus PSI. Most engines are in the 120 to 150 range. Knowing what
is supposed
to be will tell you if you have a problem once you test it. On multi
cylinder
engines compression must be relatively even. Readings of 140 and 150
are ok.
But 120 and 150 is not. If it is off by over 10% you have yet another
adventure
ahead of you. Cylinder compression has nothing to do with the condition
of the
crankshaft seals. Nothing. Seals are a key factor in the condition of
any
engine. It may start and run but with a bad seal it will not run long.
Spark: Having spark is important but having that spark at the correct
time is
critical. If your timing is a little off you will be robbed of power.
If it is
a lot off you will melt the engine or it will not run at all. If you do
not
have the proper tools and instruments to set timing, start with the
stator in
the center of the adjustments and pay very close attention to operating
temps
and spark plug color. Other factors like air/fuel mixture and gas/oil
ratio can
affect color so make sure everything is where it is suppose to be.
Spark plug
gap and point gap have to be set to specs. A common problem is an
engine that
will not start but only backfires when you pull it over. It may be
firing 180 degrees
out of time. A quick test would be to switch the plug wires around. If
it then
starts the fix would be two reverse the two wires going to the external
coils.
Fuel: Again the ratio of air to fuel is critical. Too lean and the
engine will
run hot and melt down. Too rich and it will smoke, foul plugs and run
poorly.
The gas oil mixture is important also. Too much oil and it smokes and
carbons
up the plugs. Too little oil and the bearings run dry and the engine
will
overheat and seize up. Old gas will not burn right. If you have 3 year
old gas
in the tank it may not run at all. Always buy premium gas. The benefits
are
worth the extra 20 cents a gallon.
So, testing the engine has determined that it needs some quality time
on the
workbench. The best way to go is a complete engine tear down with every
single
piece taken apart. Every nut and bolt. If you do not know the history
of the
engine, if it is stuck, if it has noises when you roll it over, if you
can see
damage on it or in it, if there is a hole in the piston, if there is
white
aluminum deposits on the plugs or the exhaust manifold or if you are
just bored
some weekend... grab your tools.
The only tool you may not have is a puller for the flywheel. A harmonic
balancer puller is the tool you need. You can buy one for $50, rent one
or
barrow one from a friend or a garage. But you need one. A three jaw
puller may
work to remove the flywheel but if you go that route you will need a
new
flywheel. If you take a torch to the flywheel to remove it you will be
looking
for a new flywheel also. Even if the flywheel has never been off the
crankshaft
it will come off with the proper puller and some patience. In some
cases
patience is spelt BFH.
The primary clutch also requires some finesse to remove. Again the tool
to use
is the proper puller. Buy one, rent or barrow the specific puller for
the
clutch you have in front of you. There are 30 some pullers out there so
make
sure that the one in your hand if the correct one. Never reach for the
torch to
help with a stubborn clutch. A heat gun is ok but as clutches are made
from die
cast metal and some clutches have plastic pucks in them the torch will
turn
them into a puddle.
A service manual is a must if this type of work is new to you. It will
offer
step by step instructions and pictures. Specs and tolerances that have
to be
met are important. Sure some things are obvious but others require
careful
measurements. As you remove parts from the engine put them in a pail so
you
don't lose any small pieces like woodruff keys and smaller fasteners.
Once you
are down to the crankshaft you are done. Now the cleaning starts. It
takes me
at least three hours to clean an engine. Every part gets soaked and
brushed and
then is inspected. All carbon deposits are removed. Ports cleaned with
a small
brush. Oil passages checked. It is very detailed work but a clean
engine is
happy engine and even a tiny spec of rust, dirt or metal fragment in a
bearing
means you get to tear it all down again in a week. Once every part is
clean the
inspection begins. Heads need to be damage free. Spark plug threads
chased.
Rings inspected and spec out or better yet renewed. Pistons carefully
examined.
Look for cracks, scars, groves, and sign of overheating. Look closely
at the
flywheel magnets. Are they loose or damaged? Wrist pin bearings and
pins: Any
damage to the circlips when you removed them?
The crankshaft needs very close inspection. This is one component that
you may
have to place in the hands of a pro if service is needed. You can chase
the
threads in the PTO end where the clutch retainer bolt was. The threads
for the
flywheel nut can be chased it they need it. There can be as few as two
main
bearings or as many as six on your crank. If any are noisy, loose or
stuck you
have gone as far as you can. But if you have a press and some shop
tools you
can change the outer bearings. If the problem bearing is in the middle
or the
connecting rod bearings are flaking, rough or questionable off to the
pro the
crank must go. Look very closely at the center seals. If they are
sloppy on the
shaft or the springs are missing then you have to see the crankshaft
doctor.
At a minimum you will need a complete engine overhaul kit. This will
include
all seals, gaskets and O-rings that are needed for a rebuild. Once you
are
ready for reassembly open up the package and lay out all the pieces in
the set.
Account for each part. Note that some kits contain extra parts that may
not be
needed in your engine. Again having the service manual open on the
bench is the
way to go.
Sort through all the hardware that you cleaned. Put all like pieces in
separate
piles. This will help make sense of it all as there can be over 100
nuts,
bolts, and washers in the pile. Put one of a kind parts and spacers in
a separate
pile. For example having all 8 mm washers in one pile and all 6mm nuts
in
another will help. If you sort through all the hardware beforehand this
really
does help.
I use a muffin pan, sometimes two. For example if you put all the 6mm
bolts in
one pile and sort through them by length you can see that the two long
ones are
for the coils, the three shortest ones are for the starter cup, the
four slotted
ones are for the recoil, these 8 must be for the shrouding and these
four are
for the intake manifold. When you are looking at the bolts for the case
halves
note that there may be 12 bolts but they are not all the same length.
Inspect all
the threads on the studs and bolts. If they are damaged replace them or
chase
the threads. If you have a blown out hole on, for example one of the
recoil
holes in the fan housing, you can install a heli-coil to make it good
as new.
Don't mess with damaged hardware as it will be a problem when you go to
torque
everything down. Used just enough sealant when you put the case halves
together, not too much. If it is oozing out on the outside it is also
oozing
out on the inside. Sealant does not make a good lubricant for bearings.
Coat base gaskets with oil. Pre-lube all bearings with oil. It will
smoke big
time on first startup but it will be well lubed. Torque heads slowly
and evenly
and re-torque after the engine is started, warmed up and then allowed
to cool
down.
After all this is said remember that the keys to a successful rebuild
are clean
parts, close inspection and attention to details. It is not rocket
science but
it does require time and patience. You may find it necessary to use
some emory
cloth here and there, file a nick off of something, and hone the
cylinders, etc,
but when you do that please re-clean those parts.
Article by Todd Schrupp “JDT”
Posted on the JDsleds.com Community Forums.